Ansible Configuration
In this activity you will:
- Define Module Communications
- Define Address Objects
- Define Service Objects
- Define Security Rules
- Define NAT Rules
- Commit the Configuration
- Run the Playbook
For this portion of the lab, you’re going to be using the Palo Alto Networks Ansible modules.
First, let’s change to the Ansible configuration directory.
$ cd ~/multicloud-automation-lab/configuration/ansible
Module Communications
Just like with Terraform, your first task is setting up the communication with the firewall. The IP address, username, and password (or API key) can be set as variables or specified on the command line. However, since we’ve already got them as environment variables, we can just read them in.
The vars.yml file contains the following:
provider:
  ip_address: "{{ lookup('env', 'PANOS_HOSTNAME') }}"
  username: "{{ lookup('env', 'PANOS_USERNAME') }}"
  password: "{{ lookup('env', 'PANOS_PASSWORD') }}"
This code simply reads the content of the environment variables we set in the
Terraform portion into the dictionary provider. This is then referenced by
our playbook file, playbook.yml.
Similar to the Terraform portion of the lab, our firewall doesn’t have any objects or rules configured. We’re going to implement that with an Ansible playbook.
Note
You wouldn’t actually change tools in the middle of configuration like we’re doing here. We just want you to get exposure to both tools and see that you can accomplish the same tasks with either one.
Address Objects
Open the playbook.yml file in your text editor. It will contain the following:
---
- hosts: localhost
  connection: local
  gather_facts: false

vars_files:
  - vars.yml

roles:
  - PaloAltoNetworks.paloaltonetworks

tasks:
  - name: Create web server object
    panos_address_object:
      provider: "{{ provider }}"
      name: "web-srv"
      value: "10.5.2.5"
      commit: False
      state: present

  - name: Create DB server object
    panos_address_object:
      provider: "{{ provider }}"
      name: "db-srv"
      value: "10.5.3.5"
      commit: False
      state: present
This playbook creates the following address objects by using the
panos_address_object module.
Also notice the fact that commit is set to False, so that we don’t have
to wait on a commit each time a module runs.
Service Objects
Next, create some service objects. We want to allow SSH on some non-standard ports so we can easily communicate with web and DB servers behind our firewall. You’ll need to refer to the panos_service_object module documentation.
The example code for that module looks like this:
- name: Create service object 'ssh-tcp-22'
  panos_service_object:
    provider: '{{ provider }}'
    name: 'ssh-tcp-22'
    destination_port: '22'
    description: 'SSH on tcp/22'
Use the panos_service_object module to create two objects with the
following definitions:
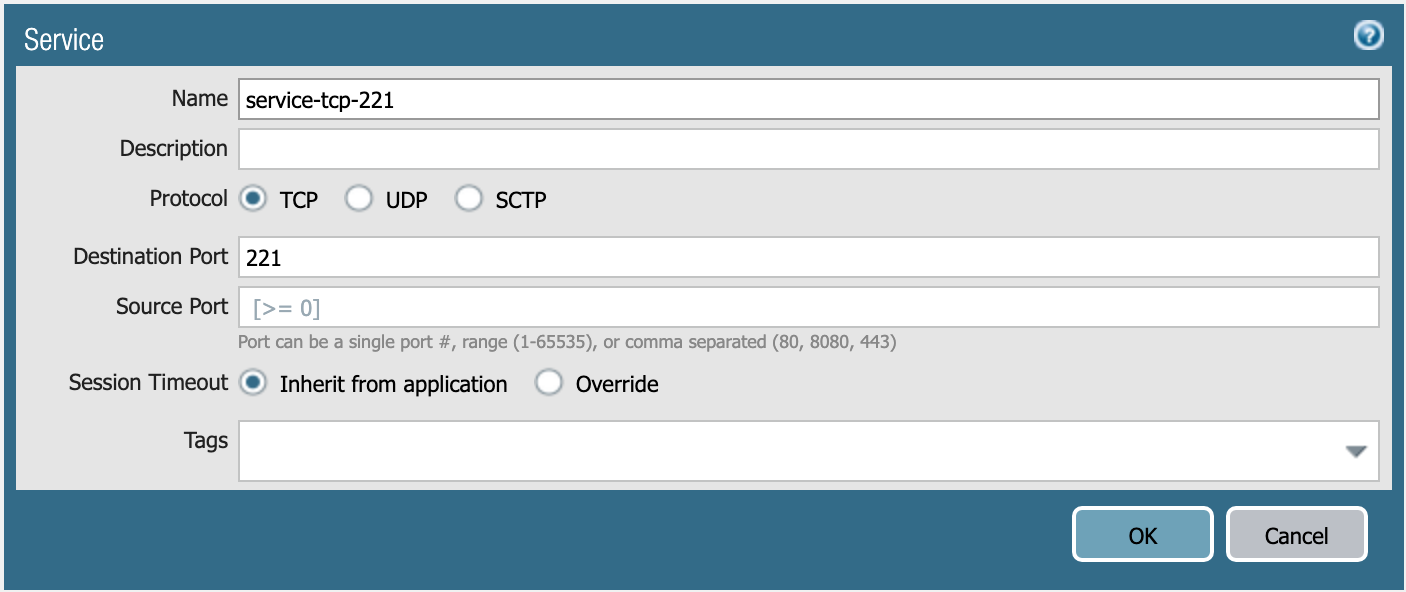
service-tcp-221 service object.
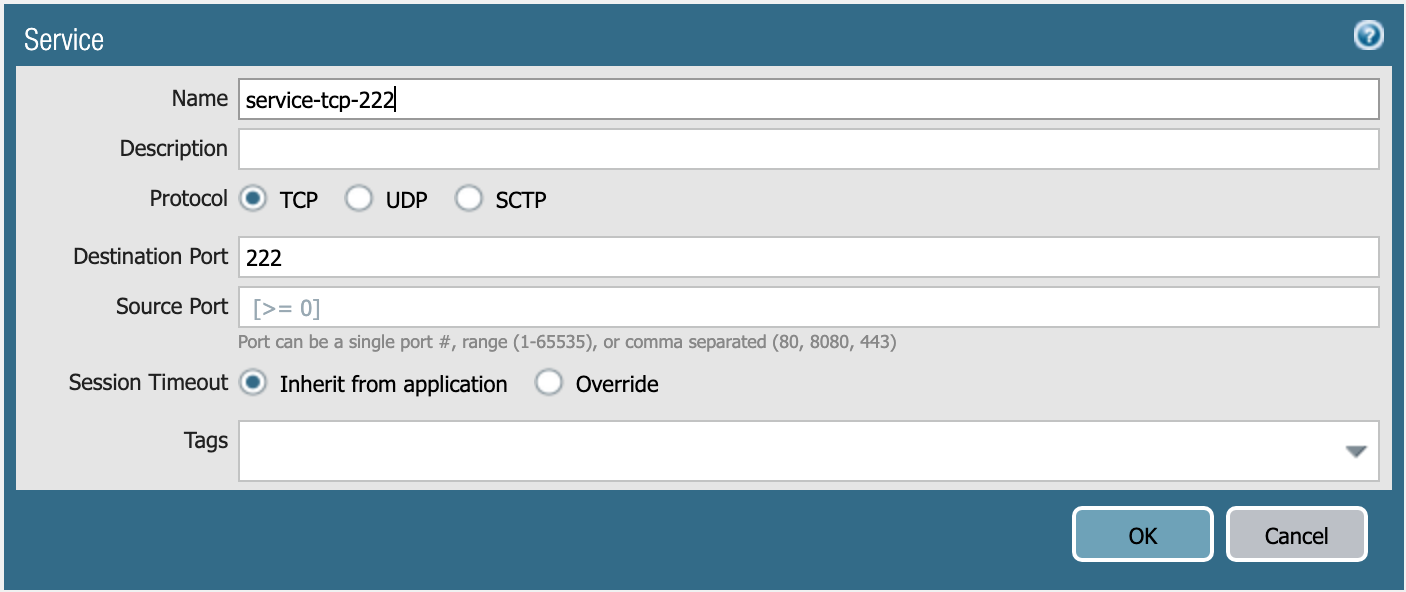
service-tcp-222 service object.
Security Rules
Now we need to create security rules to allow traffic. You’ll need to refer to the panos_security_rule module documentation.
The example code for that module looks like this:
- name: add SSH inbound
  panos_security_rule:
    provider: '{{ provider }}'
    rule_name: 'SSH permit'
    description: 'SSH rule test'
    source_zone: ['public']
    source_ip: ['any']
    destination_zone: ['private']
    destination_ip: ['1.1.1.1']
    application: ['ssh']
    action: 'allow'
Use the panos_security_rule module to create the following security rules:
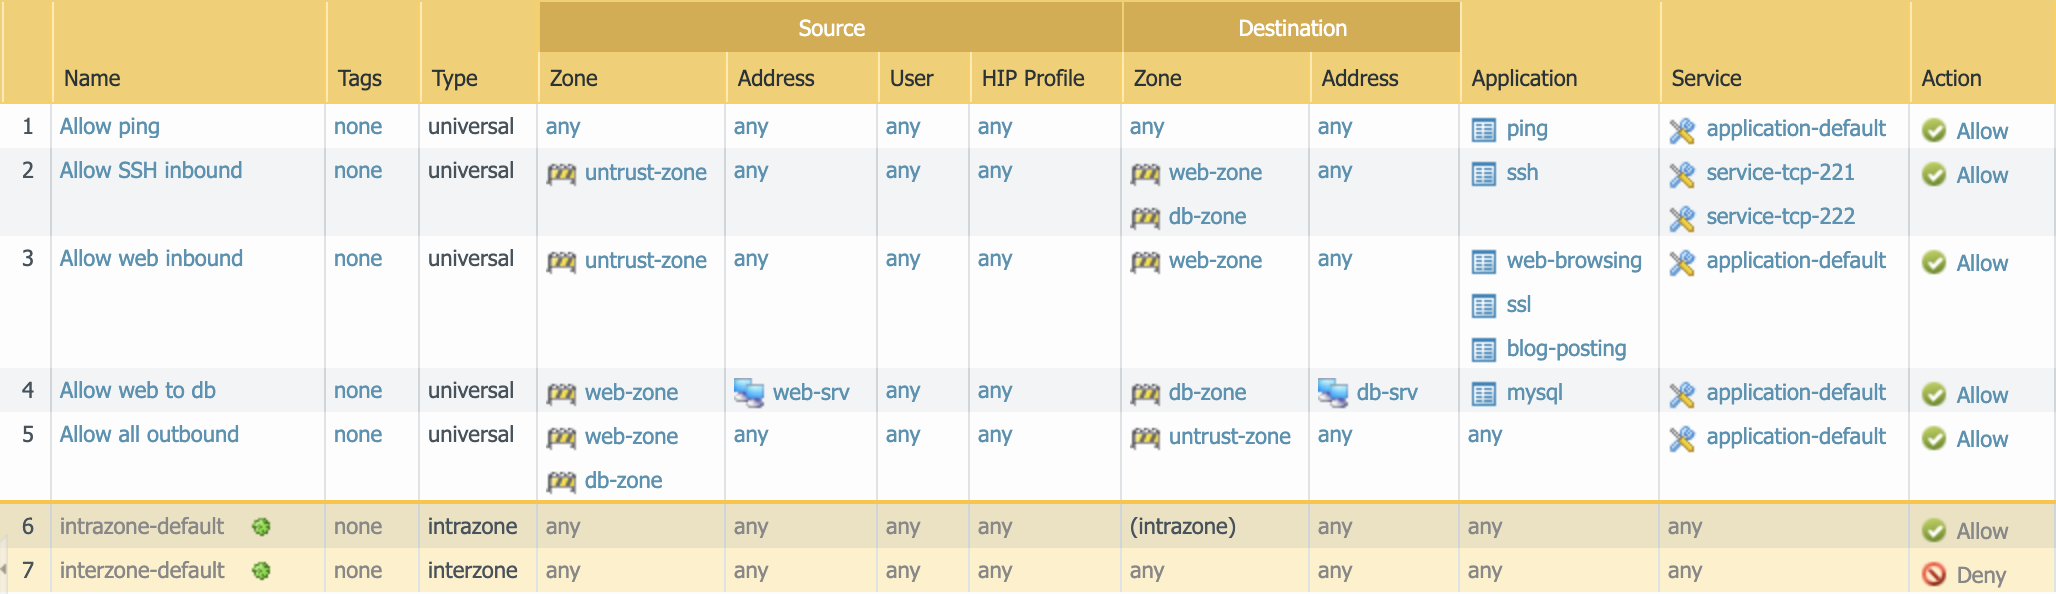
Security rules to be created.
NAT Rules
Now we need to create the required NAT rules. You’ll need to refer to the panos_nat_rule module documentation.
The example code for that module looks like this:
- name: Create NAT SSH rule for 10.0.1.101
  panos_nat_rule:
    provider: '{{ provider }}'
    rule_name: "Web SSH"
    source_zone: ["external"]
    destination_zone: "external"
    source_ip: ["any"]
    destination_ip: ["10.0.0.100"]
    service: "service-tcp-221"
    snat_type: "dynamic-ip-and-port"
    snat_interface: "ethernet1/2"
    dnat_address: "10.0.1.101"
    dnat_port: "22"
Use the panos_nat_rule module to create the following NAT rules:
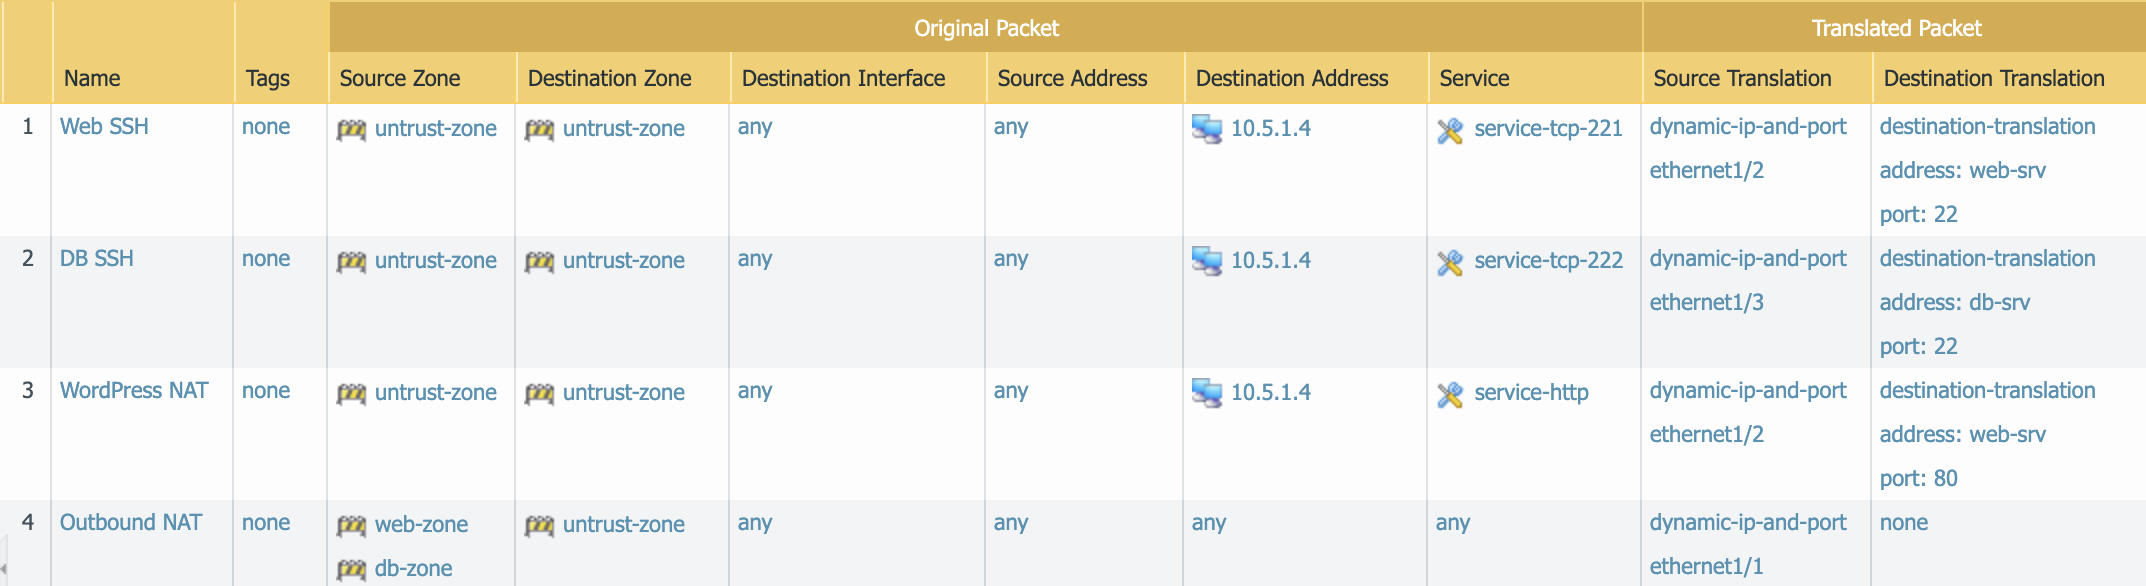
NAT rules to be created.
Note
Pay attention to the module arguments for panos_nat_rule. destination_zone
and service are strings here, not lists. This is because you can’t
write a NAT rule on PAN-OS with multiple destination zones or services.
Commit the Configuration
If you have been writing your playbook with commit set to False each
time, you have an uncommitted candidate configuration. There’s a panos_commit
module to perform a commit.
The example code for the module should do what you need:
- name: commit candidate config on firewall
  panos_commit:
    provider: '{{ provider }}'
Run the Playbook
Save and exit your playbook.yml file. Then run your playbook with the
following command:
$ ansible-playbook -i inventory playbook.yml
Log in to the web UI of the firewall, and verify that the configuration matches what you want. If you get errors, indentation is most likely the problem. Ansible is very particular about lines being indented with spaces and not with tabs.
You’re now done with the Ansible portion of the lab!