Terraform Configuration
In this activity you will:
- Initialize the Provider
- Configure Network Interfaces
- Configure Virtual Router
- Configure Security Zones
For this portion of the lab, you will be using the Palo Alto Networks Terraform for PAN-OS provider.
First, change to the Terraform configuration directory.
$ cd ~/multicloud-automation-lab/configuration/terraform
Provider Initialization
Your first task is to set up the communications between the provider and your
lab firewall. There’s several ways this can be done. The IP address,
username, and password (or API key) can be set as variables in Terraform, and
can be typed in manually each time the Terraform plan is run, or specified on
the command line using the -var command line option to terraform plan
and terraform apply. You can also reference a JSON file in the provider
configuration which can contain the configuration.
Another way you can accomplish this is by using environment variables. Use the following commands to add the appropriate environment variables:
$ export PANOS_HOSTNAME="<YOUR FIREWALL MGMT IP GOES HERE>"
$ export PANOS_USERNAME="admin"
$ export PANOS_PASSWORD="Ignite2019!"
Note
Replace the text <YOUR FIREWALL MGMT IP GOES HERE> with your firewall’s management IP address.
Now, you should see the variables exported in your shell, which you can verify
using the env | grep PANOS command:
PANOS_HOSTNAME=3.216.53.203
PANOS_USERNAME=admin
PANOS_PASSWORD=Ignite2019!
With these values defined, we can now initialize the Terraform panos provider with the following command.
$ terraform init
The provider is now ready to communicate with our firewall.
Network Interfaces
Your firewall has been bootstrapped with an initial password and nothing else. We’re going to be performing the initial networking configuration with Terraform.
You’ve been provided with the following Terraform plan in main.tf:
provider "panos" {}

resource "panos_ethernet_interface" "untrust" {
    name                      = "ethernet1/1"
    vsys                      = "vsys1"
    mode                      = "layer3"
    enable_dhcp               = true
    create_dhcp_default_route = true
}

resource "panos_ethernet_interface" "web" {
    name        = "ethernet1/2"
    vsys        = "vsys1"
    mode        = "layer3"
    enable_dhcp = true
}

resource "panos_ethernet_interface" "db" {
    name        = "ethernet1/3"
    vsys        = "vsys1"
    mode        = "layer3"
    enable_dhcp = true
}
This configuration creates your network interfaces. The PAN-OS provider doesn’t need any additional configuration specified because it is pulling that information from the environment variables we set earlier.
Now, you can run terraform apply, and the interfaces will be created on the
firewall.
Virtual Router
Now, you’ll have to assign those interfaces to the default virtual router. You will need the panos_virtual_router resource.
The example code from that page looks like this:
resource "panos_virtual_router" "example" {
    name = "my virtual router"
    static_dist = 15
    interfaces = ["ethernet1/1", "ethernet1/2"]
}
Your version will be similar, but it should have the following definition:
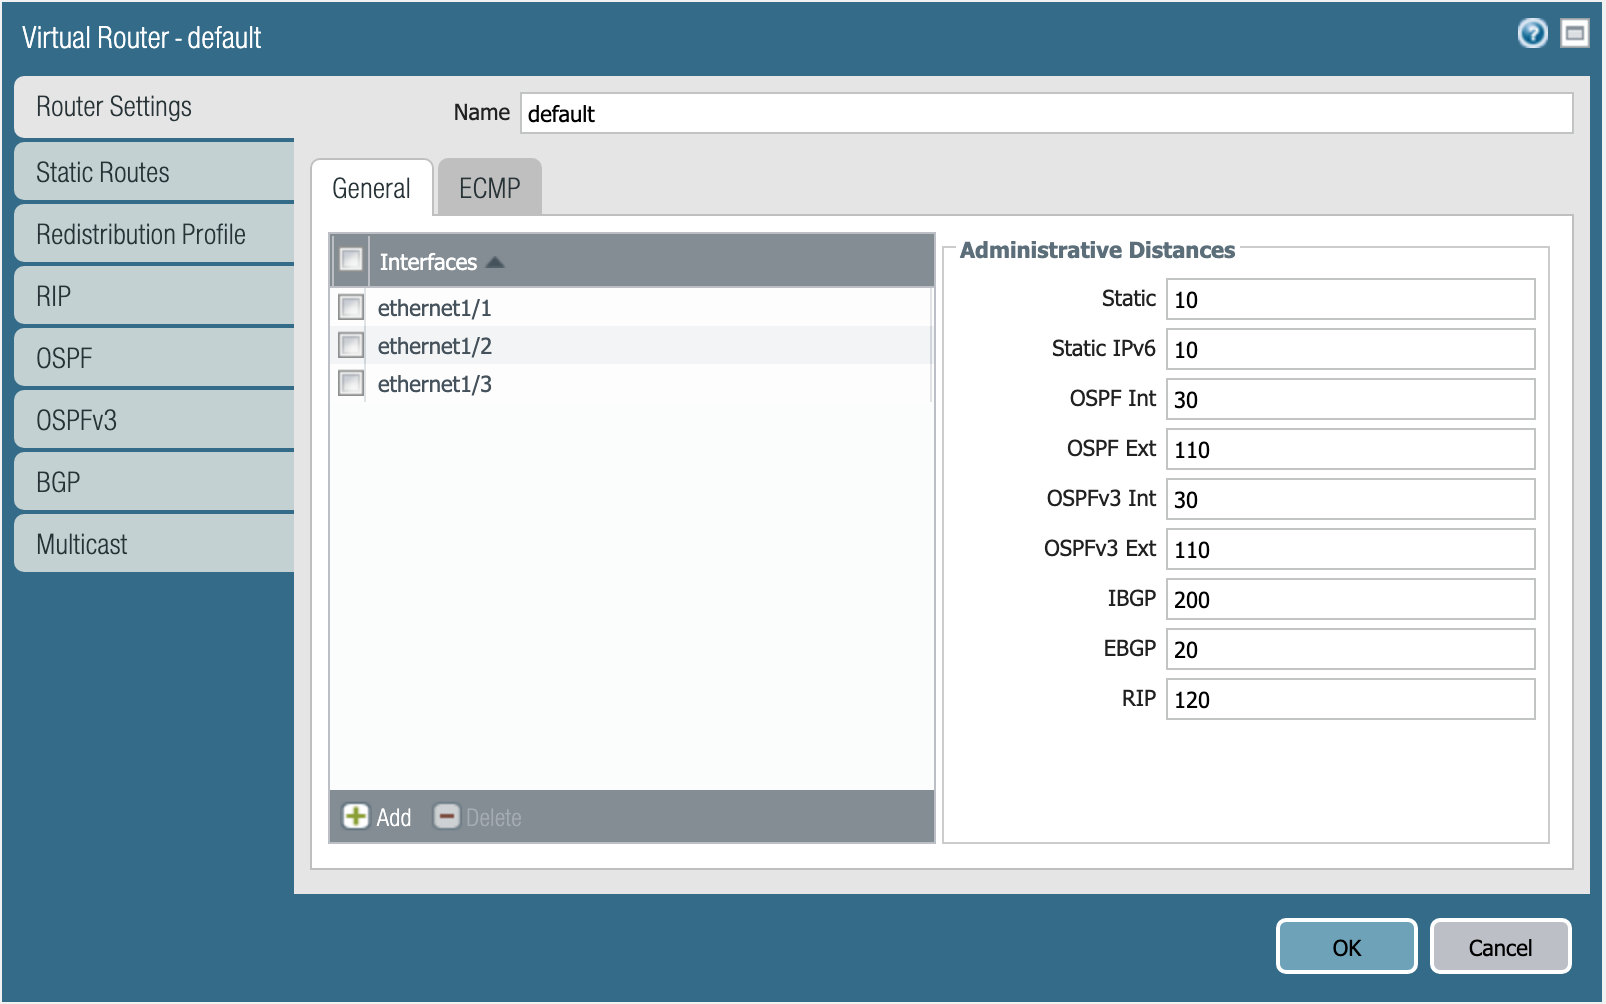
Virtual router default.
Specifying the static distance isn’t required.
Define the virtual router resource in main.tf, and run terraform apply.
Warning
AWS and GCP have slight differences in the way that routing has to be configured. If you chose GCP as your cloud, you have an additional step!
If you chose AWS, please continue to Security Zones section and skip the following.
GCP requires static routes for each subnet to be defined on the virtual router. You will need the panos_static_route_ipv4 resource.
The example code from that page looks like this:
resource "panos_static_route_ipv4" "example" {
    name = "localnet"
    virtual_router = "${panos_virtual_router.vr1.name}"
    destination = "10.1.7.0/32"
    next_hop = "10.1.7.4"
}

resource "panos_virtual_router" "vr1" {
    name = "my virtual router"
}
This code adds a static route named localnet, that routes traffic destined to the network 10.1.7.0/32 to the next hop of 10.1.7.4.
You will need to create three resources for the static routes depicted below:
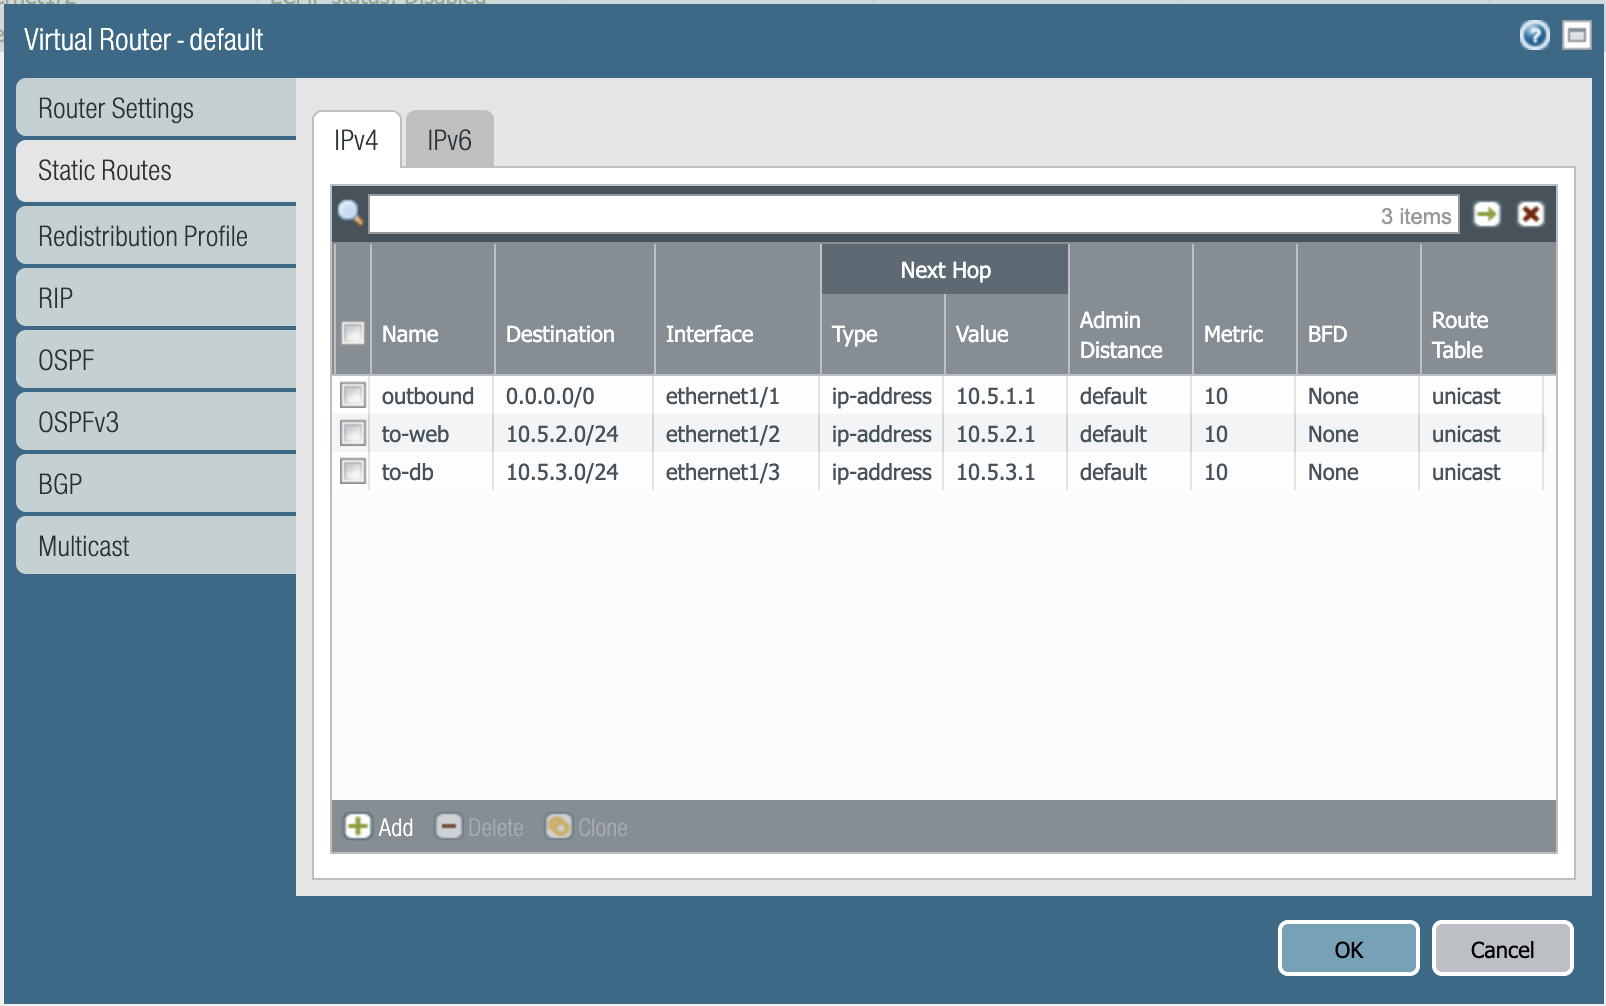
Static routes needed in GCP.
Define those resources in main.tf, and run terraform apply.
Security Zones
Next is creating the security zones for the firewall. You will need the panos_zone resource.
The example code from that page looks like this:
resource "panos_zone" "example" {
    name = "myZone"
    mode = "layer3"
    interfaces = ["${panos_ethernet_interface.e1.name}", "${panos_ethernet_interface.e5.name}"]
    enable_user_id = true
    exclude_acls = ["192.168.0.0/16"]
}

resource "panos_ethernet_interface" "e1" {
    name = "ethernet1/1"
    mode = "layer3"
}

resource "panos_ethernet_interface" "e5" {
    name = "ethernet1/5"
    mode = "layer3"
}
You need to create three security zones (similar to e1 or e5 in this example),
but they need to have the following definition:
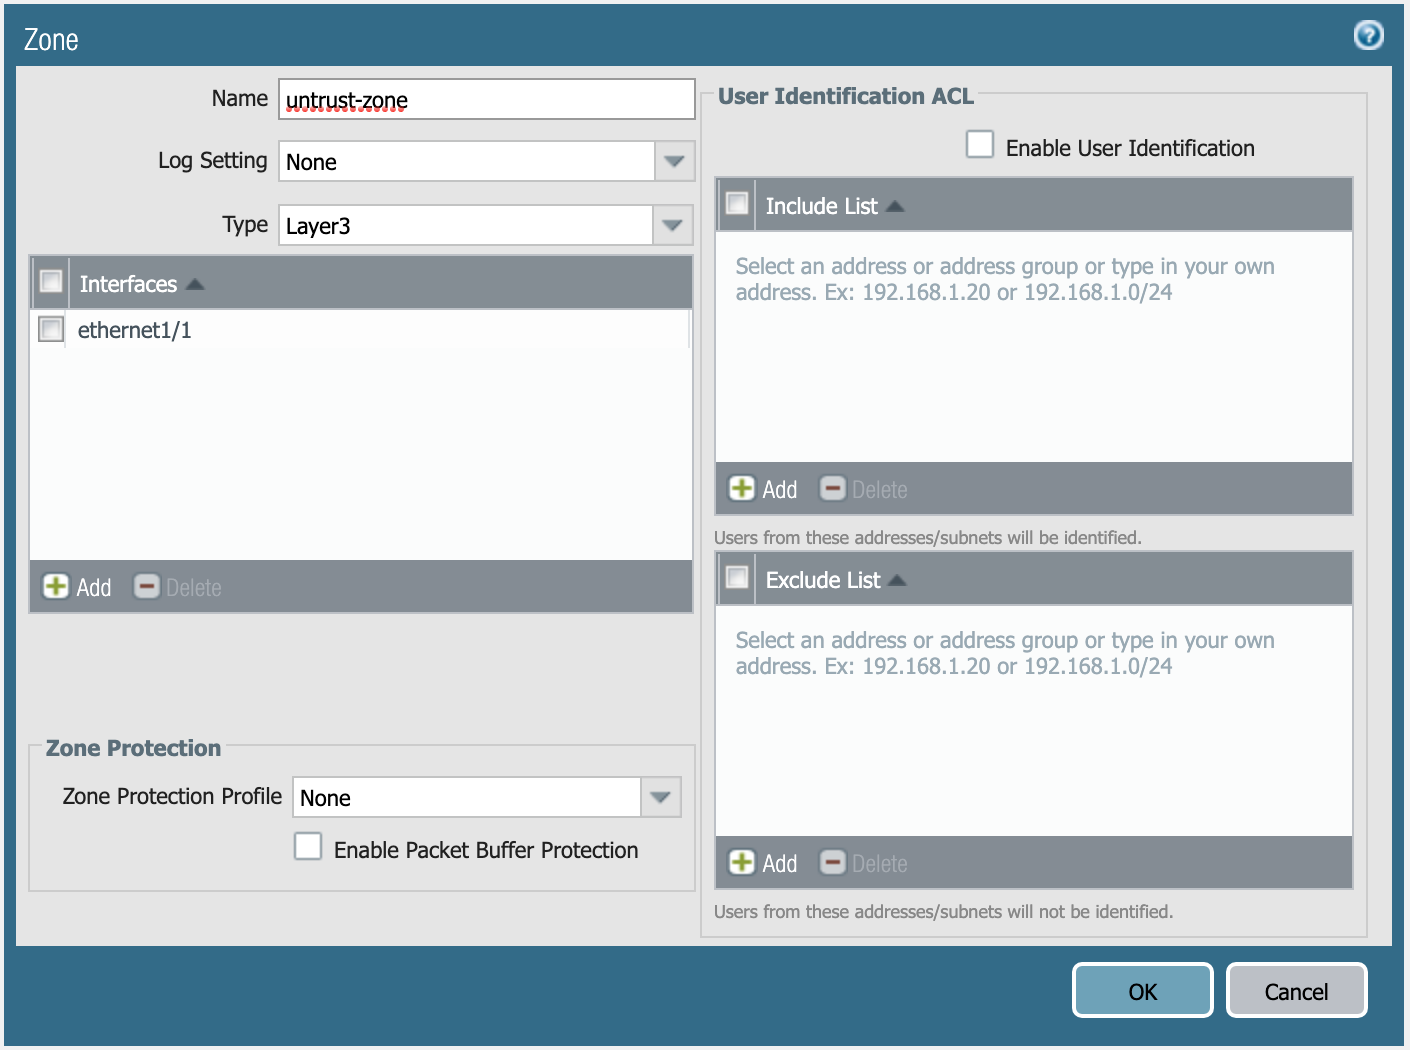
Definition of untrust-zone.

Definition of web-zone.
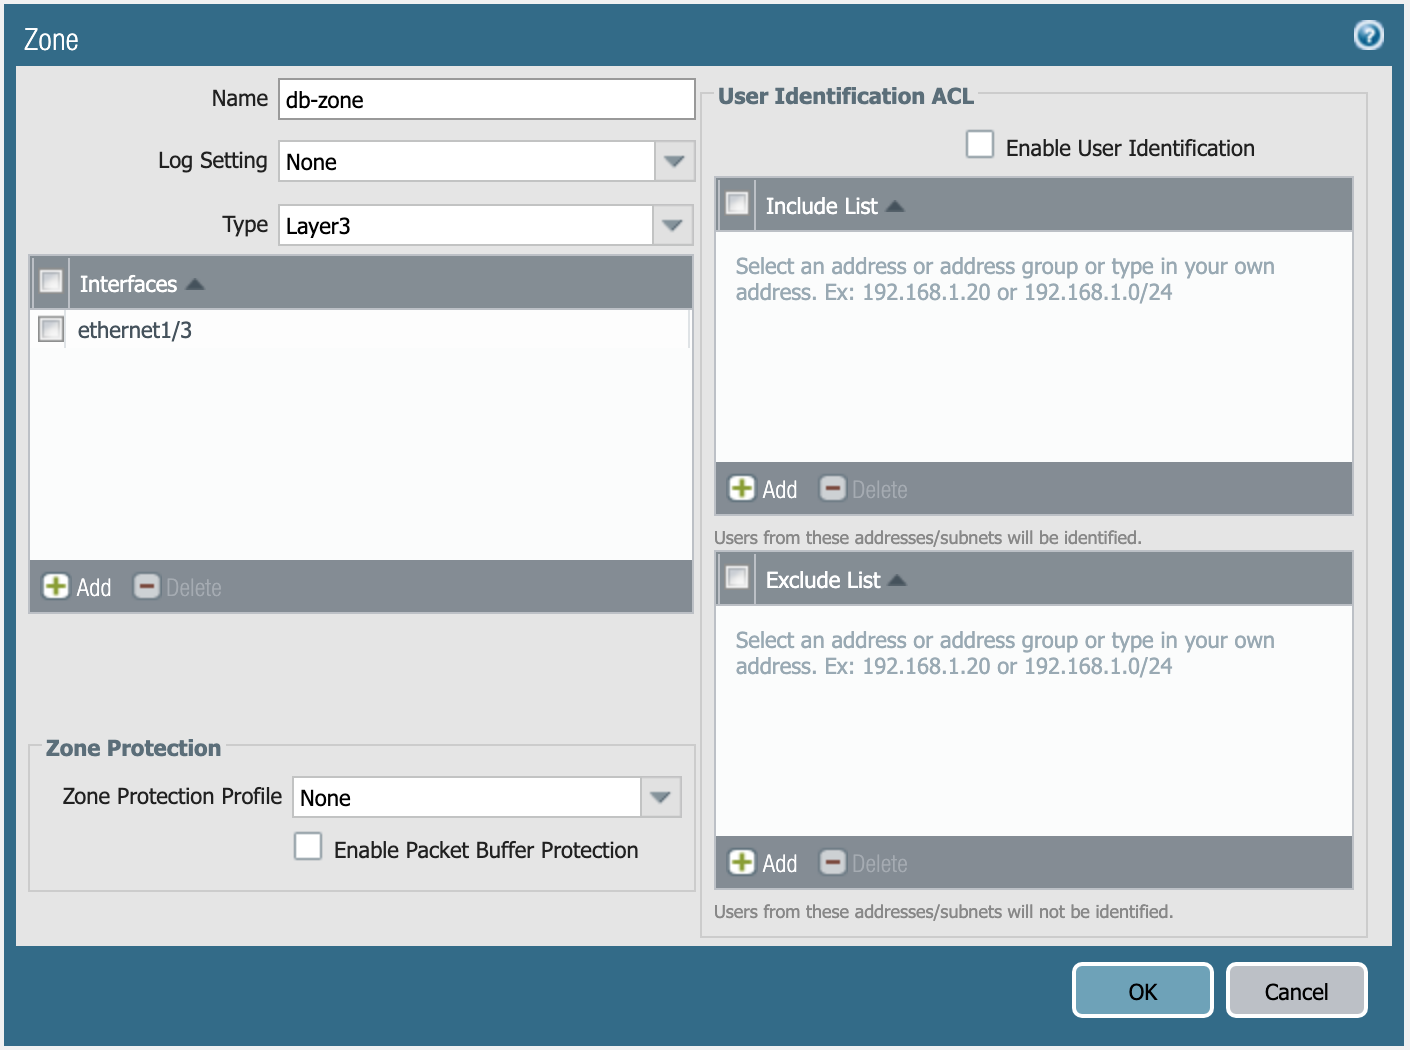
Definition of db-zone.
Define those resources in main.tf, and run terraform apply.
You’re done with the Terraform portion of the lab!